Reading time: 7 minutes
In this tutorial, we will show you how to create items for your schedule in your app and how to present your event agenda interactively. Link speakers, locations, and rooms. Integrate contact information and use images.
In this tutorial, we will deal in detail with the event agenda. We start with the fundamental creation of a schedule item and close with 10 further options such as the integration of pictures and external documents.
As a showcase, we use a demo app where you can experience the results of this tutorial and further examples on your smartphone.
The First Item for Your Schedule
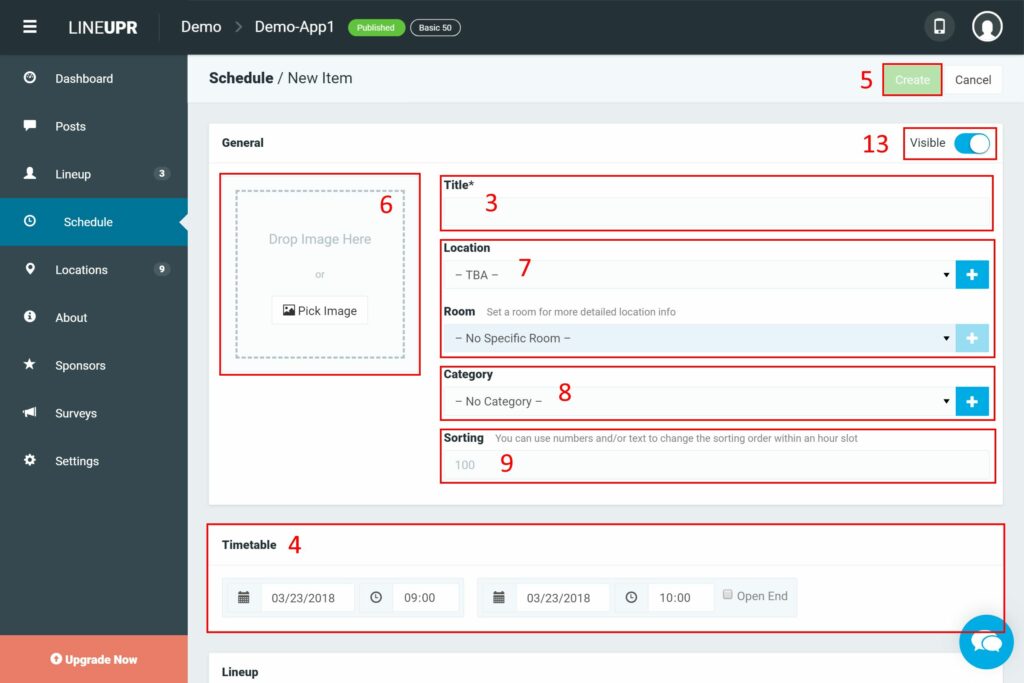
First, login into your account and access the dashboard of your event. Now open the menu item “Schedule” (1) and initiate the creation with a click on “+ Add Item” (2).

Now you should see the creation screen. To set up a new item, enter a „Title“ (3), the time and the date of this program item (4). After that, you can already save and publish it with “Create” (5).
In the next section, you will find more options to bring your agenda to life.
Additional Features
We offer you 10 possibilities to improve your digital agenda:
1. Image (6)
You can include pictures for each item. In contrast to person or location profiles, for schedule items often symbols or pictograms are used instead of classic images. These graphics are intended to illustrate the topic of this program item.
For breaks, most event managers use a coffee cup graphic and for lectures a canvas graphic. So, It is up to you, which kind of illustration you use. In the demo app https://lineupr.com/demo/app you can see examples for both.
To use this option, either drag and drop your image/graphic or click on “Pick Image” and select one of the already existing ones. Or you can also upload an additional image by using the “Upload Images” button.
LineUpr supports JPEG and PNG formats. The image should be at least 300×300 pixels in size and square. We also offer an image editor for optimal depiction. To use it, first select the image. Now you see three options beneath the picture. With the button “Change” you can select a new image, with “X” you delete it and with the „Pencil“ you can change the size (zoom), the background color and the position of the image.
2. Title (3)
Yes, you can change the title of the item afterward.
For this, we have developed the input field “Title” in the first block “General”.
3. Location and Room (7)
Most events take place at a pre-defined location. You can connect a program item to a location and room via the selection field “Location” and “Room”. At best, you have already created a location in the app. How to do this is explained here.
You can also create the item even when the location is not yet known. Then, Instead of the location the placeholder “Will be announced” will be displayed in the app (you can also change this placeholder, more about this in a later tutorial).
To select a location, just click on the “Location” selection box and choose one of the locations already existing. Or you can create a new one by clicking on the “+” button to the right.
You can also connect an associated room. Select the associated entry in the “Room” drop-down field or create a new room for the location with the “+” button to the right.
4. Categories (8)
You can also assign a category to an item.
Categories can be used to distinguish between different types program items such as workshops, keynotes, lectures or breaks. Or you use categories to separate several parallel tracks or themes. Your app users can then filter them by topic or type of items in the agenda.
To use categories, either select an existing category in the “Category” field or create a new one by using the “+” button.
5. Sorting (9)
When several program items start at the same time, they are displayed in one section in the app. The sorting in this section is done in alphabetical order according to the item title. If you prefer a different order, use the sorting input field.
You will find this feature in the first block “General”. The order is then determined alphabetically by this input field. Numbers ranked higher than letters and items with a one are displayed at the top. Larger numbers further down.
Note: The Sorting feature only works within the app. It does not affect how the items are being arranged in the LineUpr CMS. Here, the items are being sorted first by date and time and then by the time of creation.
6. Timetable (4)
You can edit the date and time of the item at any time. Select the corresponding input fields and either enter the data manually or use the selection box. Instead of an end time, you can also select “Open End”.

7. Lineup (10)
Usually, each program item is at least linked to one responsible person. Mostly a speaker or artist. We offer the possibility to associate this person with items. But first, you have to create this person in advance in the menu item “Lineupr”. In this tutorial, we explain how to create such a profile.
To associate a person enter the first letters of the person’s name in the input field. Matching profiles will be shown automatically. Connect the person with a click on the respective profile.
To remove an association from the item click on the “X” at the right edge of the profile. Next to this “X” is also a symbol showing two opposing arrows. With this button, you can determine the order of the displayed persons. Simply move the person up or down.
8. Description (11)
You can add a description text for schedule items. Describe the program point in more detail. What do you want to discuss? What is the added value for the participant?
Enter your text into the input field “Description”. We also offer a simple text editor to set bullet points and use bold, italic or underlined text.
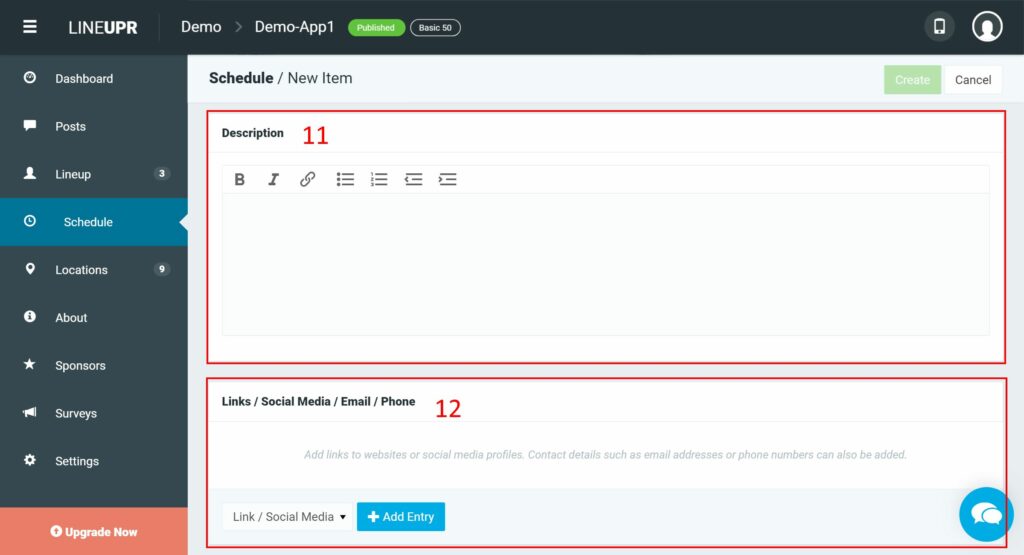
9. Additional Information and Links (12)
You may also want to add external links, information and contact details to your schedule. For example, you could set links to surveys or sponsor profiles in the appropriate schedule item.
Or you can link digital documents such as PDFs to the program item. Many of our event managers link the speaker slides. Then, the participants can receive the materials via the app.
To integrate such information, at first, you have to select whether you want to enter a link, an email address or a phone number and choose “+ New Entry”. You have to enter links in full form of writing like „http://“. The same principle applies to telephone numbers and the area code.
In the “Description” field next to the link, you can also enter a description for that element. For example, the descriptions “Phone number of XYZ” or “LinkedIn profile” are very beneficial.
10. Visibility of Schedule Items (13)
Perhaps you are working with schedule parts you don’t want to publish before a specific date. Some keynotes or closing points will be kept secret until shortly before the event.
Nevertheless, you can still create the item and change the slider in the upper right corner from “Visible” to “Invisible”. Now users cannot see this item, but you have already created all the data. When the time has come, you can publish it with one click.
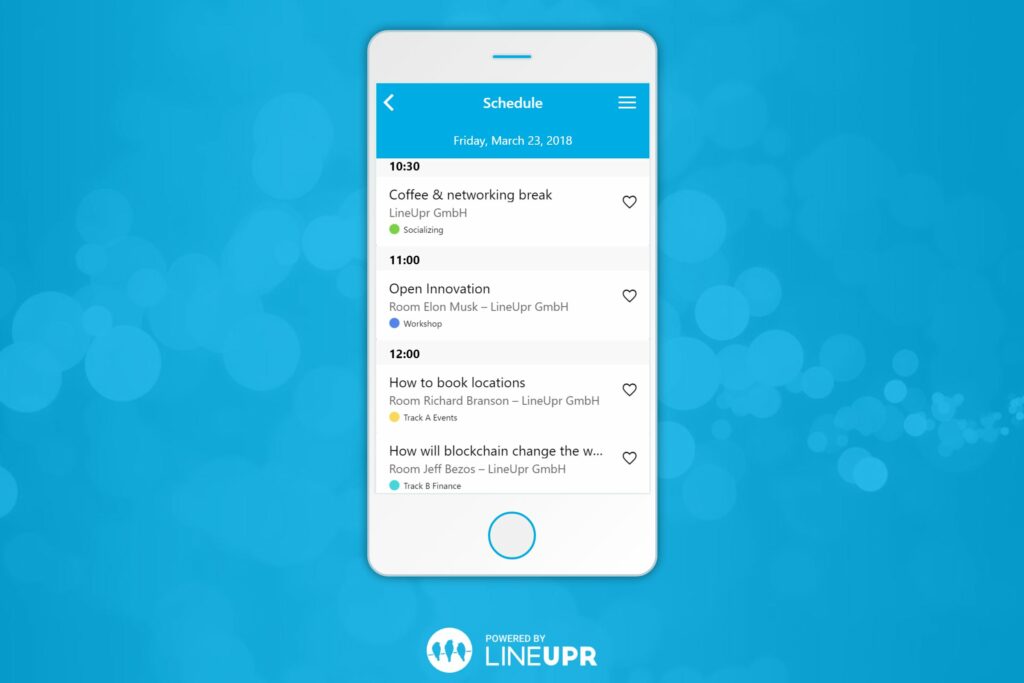
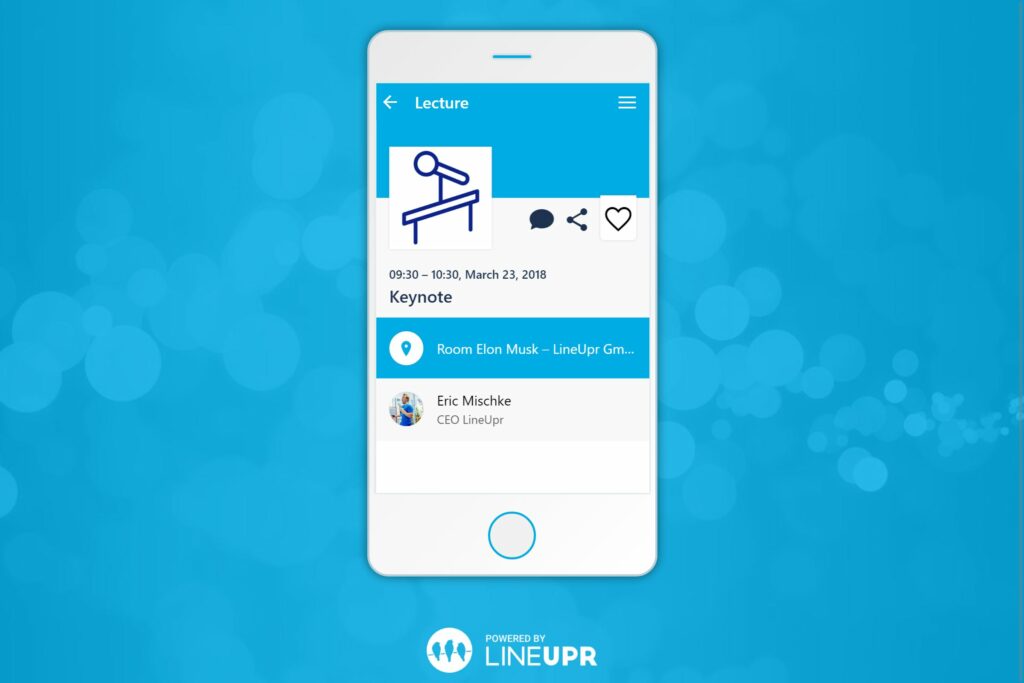
The Result
This is, how a schedule and a single item could look like:
Learnings of the day
In this tutorial, we’ve shown you how quickly you can create a digital schedule for your event. Present different program items, such as workshops, lectures, keynotes, and much more in your event app. We offer you 10 options to fill the schedule with content and to associate to other parts of the app.
We will present you further tutorials for the creation sponsors profiles, posts and much more on our blog.
What’s your opinion about digital schedules? What information do you usually use? We look forward to your feedback.
“Agenda” Icon created by Mark Shorter from “the Noun Project“.