Reading time: 8 minutes
In this tutorial, we will show you how to create profiles for your speakers, participants, and artists. Present them interactively in your event app. Use pictures, job titles, descriptions and contact data.
In this tutorial, we will deal in detail with individual profiles of people. We will show you how to present speakers, participants, artists, the organization team and many other types of people (we call them contributor) in your app. Our key issue will be the fundamental creation of a basic profile. Afterward, we will introduce further features, such as the integration of contact information.
Attention, please. Important information. In the weeks we will publish an update. With this update, you can quickly import a list of people into the app using a CSV-file. Then you can focus solely on updating the profiles and create a whole bunch of profiles within minutes. However, the functions described below still apply. But then you can set them directly in the CSV file.
As a showcase, we use a demo app where you can experience the results of this tutorial and further examples of contributors by yourself on your smartphone.
Attention, please. Important information. In the following weeks we will publish an update for creating contributor profiles. With this update, you can quickly import a list of people into the app using a CSV-file. Then you can focus solely on updating the profiles and create a whole bunch of profiles within minutes. However, the functions described below still apply. But then you can adjust them directly in the CSV file.
Your First Contributor Profile
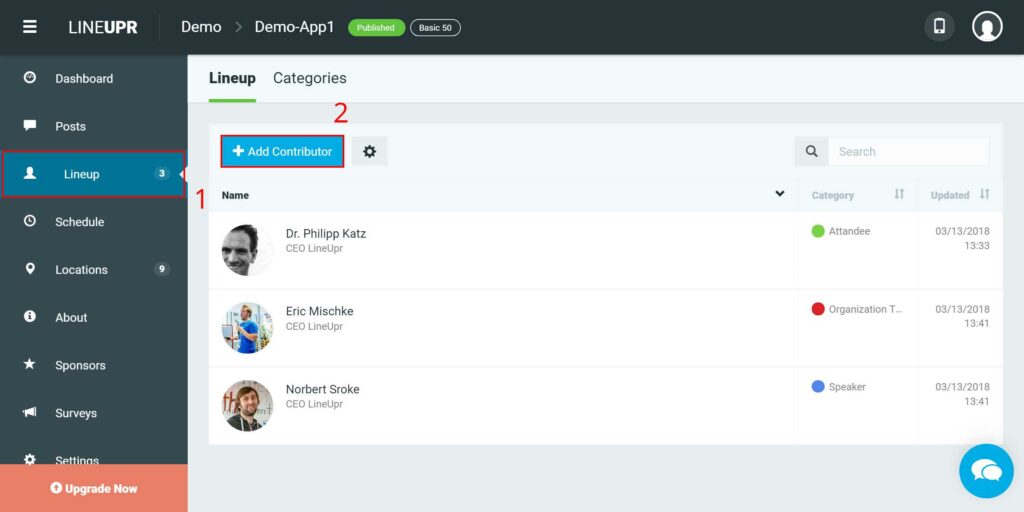
We start with the fundamental creation process of a contributor profile. At first, you have to log into your account and access the dashboard of your event. You should now open the menu item “Lineup” (1) and initiate the creation with a click on “+ Add Contributor” (2).
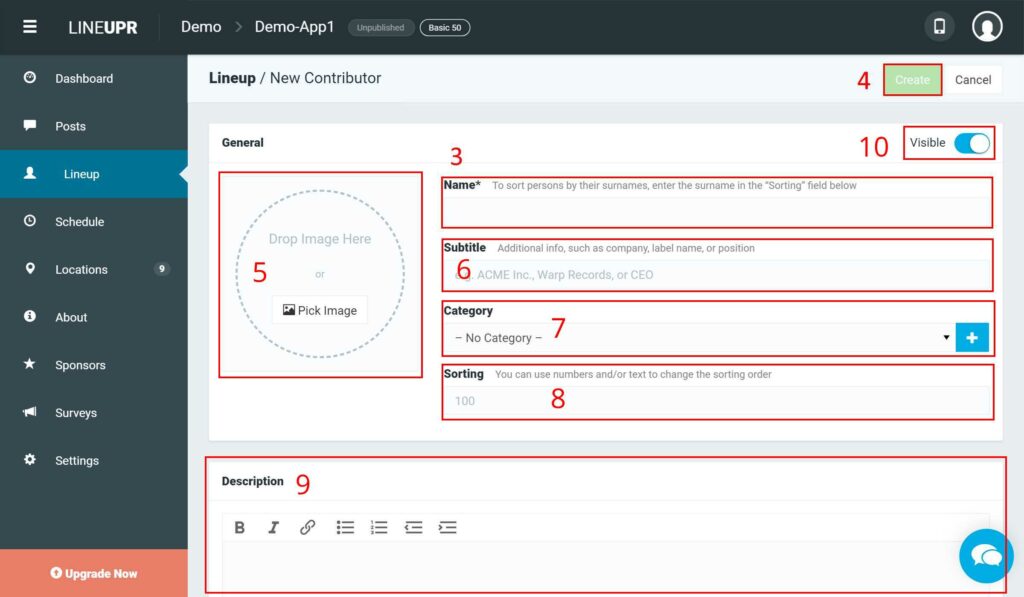
Now you see the creation screen. To set up a new contributor profile, you only need to enter a contributor name in the input field “Name” (3). After that, you can already save and publish the profile with “Create” (4). However, a convincing profile requires more information than just the name of that person. Take a look at the next section to find out what other features you can use for a compelling profile.
Additional Features
A convincing contributor profile consists of more than just a name. Therefore, LineUpr offers you many possibilities to put these profiles to life. You can select these options in the creation screen of each person profile.
1. Image (5)
You can include pictures for each profile.
To use this option, either drag and drop your image/graphic or click on “Pick Image” and select one of the already existing ones. Or you can also upload an additional image by using the “Upload Images” button.
LineUpr supports JPEG and PNG formats. The image should be at least 300×300 pixels in size and square. We also offer an integrated image editor for optimal depiction. To use it, first select the image. Now you see three options beneath the picture. With the button “Change” you can select a new image, with “X” you delete it and with the „Pencil“ you can change the size (zoom), the background color and the position of the image.
2. Name (3)
Yes, you can change the name of the profile afterward.
For this, we have developed the input field “Name” in the first block “General”. Here you can change the name of the profile.
3. Subtitle (6)
You can assign a subtitle to each profile. The subtitle is displayed below the name in the contributor profile. Most event managers use this feature to show the person’s job title. Other possibilities are the representation of the person’s company, a life vision or a quote.
To use this feature, you will find the field “Subtitle” in the first block “General”. Here you can enter your ideas for a suitable text.
4. Categories (7)
You can also assign a category to the person. Categories allow you to distinguish between different types of contributors such as speakers, participants or organizers. For example, you could create the category “speaker” and assign it to all speaker profiles. Your participants can then search for specific categories of people via the app or you can use this feature to create menu items with already set filters (more to that in a later tutorial).
To do this, select an existing category in the “Category” field or create a new one by clicking the “+” button.
5. Sorting (8)
Usually, you will use several contributor profiles. The app will display these profiles on the overview page. The default sorting of this list is in alphabetical order according to the profile name. However, you can also define your order.
For this purpose, we have developed the field “Sorting” in the first block “General”. Here you can define an individual sorting. For example, if you want the profiles to be sorted alphabetically according to the last name, you will have to copy the last name of the person in this input field for each profile. If you want to present a particular person on top, because he or she is a keynote speaker or the company’s CEO, then you should use numbers. Profiles with “1” in the “Sorting” input field are displayed at the top. Profiles with a larger number are shown further down.
Note: The Sorting feature only works within the app. It has no effect on how the profiles are being arranged in the LineUpr CMS. Here, the profiles are being sorted by time of creation.
6. Description (9)
You can add a description text for each profile. Here you can introduce the person in more detail. Where does the person currently work? How does its resume look like? What are it‘s interests and hobbies and much more.
Enter your text into the input field “Description”. We also offer a simple text editor to set bullet points and use bold, italic or underlined text.

7. Additional Information and Links (11)
No person profile is complete without contact data. Maybe you would like to introduce these people in more detail. For speakers, you could link to their official website or public projects and successes. When using participant profiles, you might be more concerned with networking between the people present. Here you can integrate their contact information or profiles from social business networks such as LinkedIn or XING.
Since LineUpr prefers lean and efficient processes, we have deliberately refrained from using a function for direct communication between participants via the app. Solutions such as the business networks mentioned above already exist for this purpose. This makes chatting and networking much more efficient since users automatically integrate their contacts and information into their daily life channels and do not have to transfer data after an event manually. Besides, it makes no difference in the handling, since you can directly access the profile of the person at LinkedIn or XING via a link and contact them there. So there is only one additional click in the usage process. At the same time, the organizer saves the stress of handling private chat data under data protection laws.
To integrate such information, at first you have to select whether you want to enter a link, an email address or a phone number and choose “+ New Entry”. You have to enter links in full form of writing like „http://“. The same principle applies to telephone numbers and the area code. In the “Description” field next to the link, you can also enter a description for that element. For example, the descriptions “Phone number of XYZ” or “LinkedIn profile” are very beneficial.
8. Visibility of Contributor Profiles (10)
You may also be working with contributor profiles you don’t want to publish before a specific date. Some keynote speakers or artists are kept secret until just before the event.
Nevertheless, you can still create the profile and change the slider in the upper right corner from “Visible” to “Invisible”. Now users cannot see this profile, but you have already created all the data. When the time has come, you can publish it with one click.
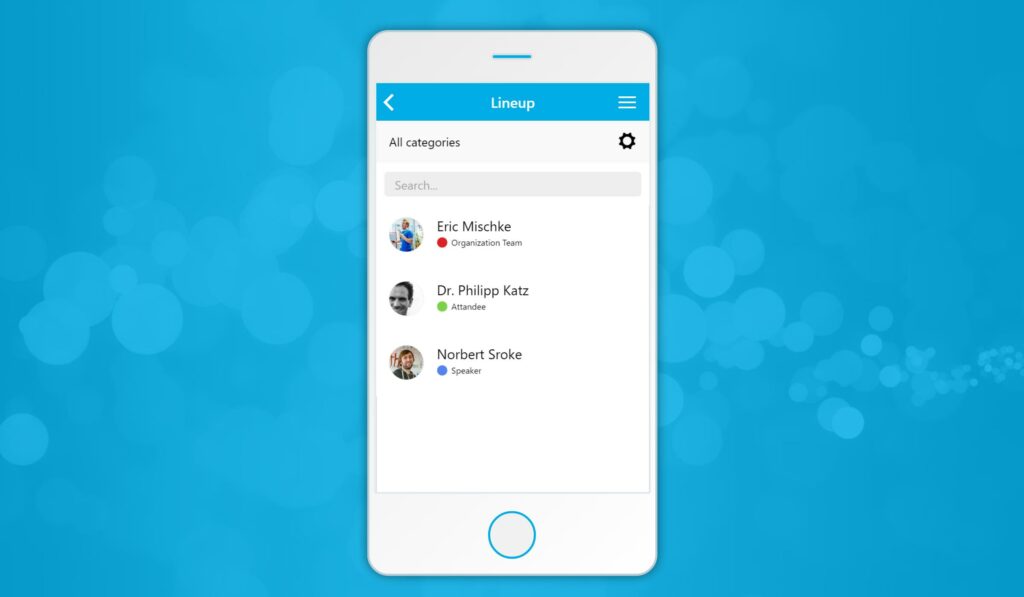
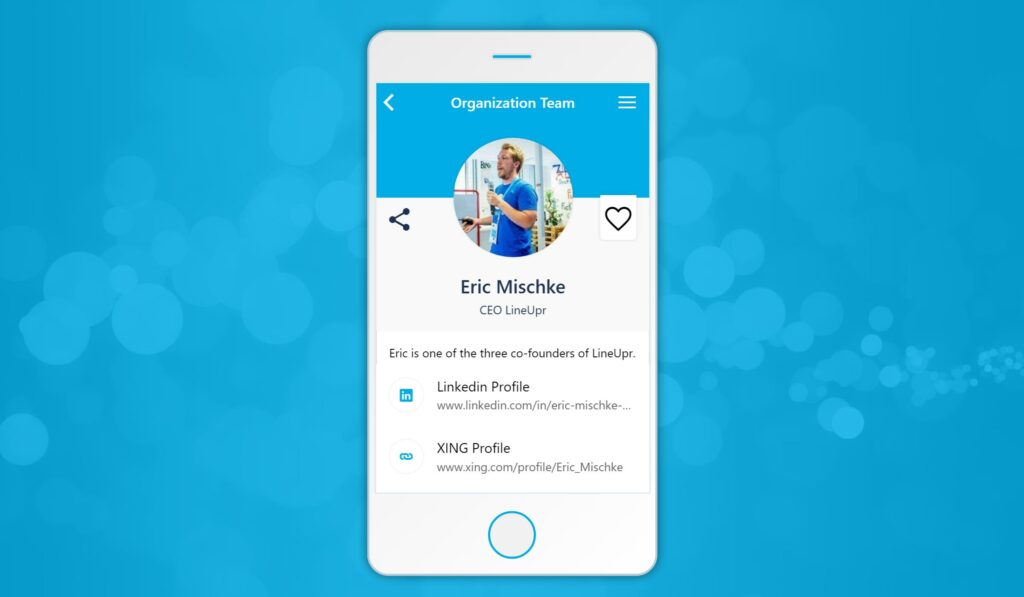
The Final Result
This is, how a person profile could look like:
Learnings of the day
In this tutorial, we’ve shown you how quickly you can create contributor profiles for speakers, participants or artists. We offer you eight functions to fill the profiles with content for optimal usage.
We will present you further tutorials for the creation of program items, sponsors, posts and much more on our blog.
What’s your opinion about contributor profiles? What information do you usually use? Will you continue to work with attendee profiles despite the changes in European data protection rules? We look forward to your feedback.
“Work Group” Icon created by Oksana Latysheva from “the Noun Project“.