Reading time: 5 minutes
In this tutorial, we deal in detail with the post-feature. We will show you how to create posts and for what cases you should use them. In the second part, we will show you, how to create and edit categories globally in the app.
As always, you will find the examples presented in our demo app.
What is a Post-Message and How Can I Use Them
With posts, you can inform your participants about program highlights, spontaneous changes or simply the start or end of the event. You can also use it to present your sponsors. More to this here. EventMB has some more cool suggestions to use posts for you.
This feature allows you to communicate directly with your guests. You create the posts in your CMS and with one click you send them to the app users.
Most event app vendors rely only on push notifications. We use in-app notifications instead. There are a lot of reasons why we prefer the in-app option but due to time limitations at this point only a short explanation. Most participants are quickly annoyed by push messages, which is why they tend to switch off this function. At the same time, a notification always interrupts the user’s behavior because we instinctively look at our smartphone when it makes a noise. Often the message is simply swiped away and forgotten.
In-app messages, on the other hand, address the user in the status when he or she wants to get information about the event (this is why he or she opens the app). This increases the attention span and the probability that the user opens and reads the message.
Create Your First Post Message
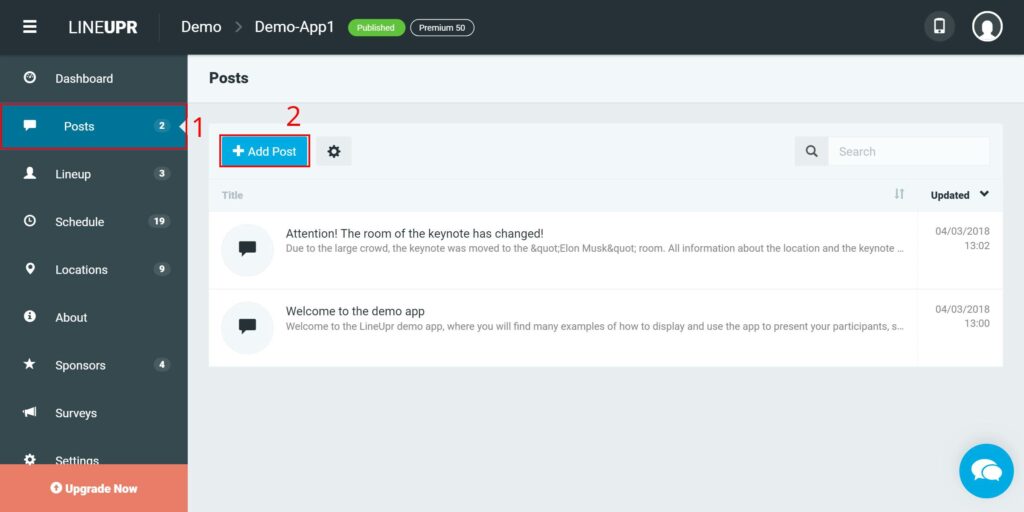
First, log into your account and access the dashboard of your event. Now navigate to the menu item “Posts” (1) and initiate the creation with a click on “+ Add Post” (2).
Now you should see the creation screen. To set up a new post, enter the “Title” (3) and the „Text“ (4). After that, you can already save and publish the post with “Create” (5).
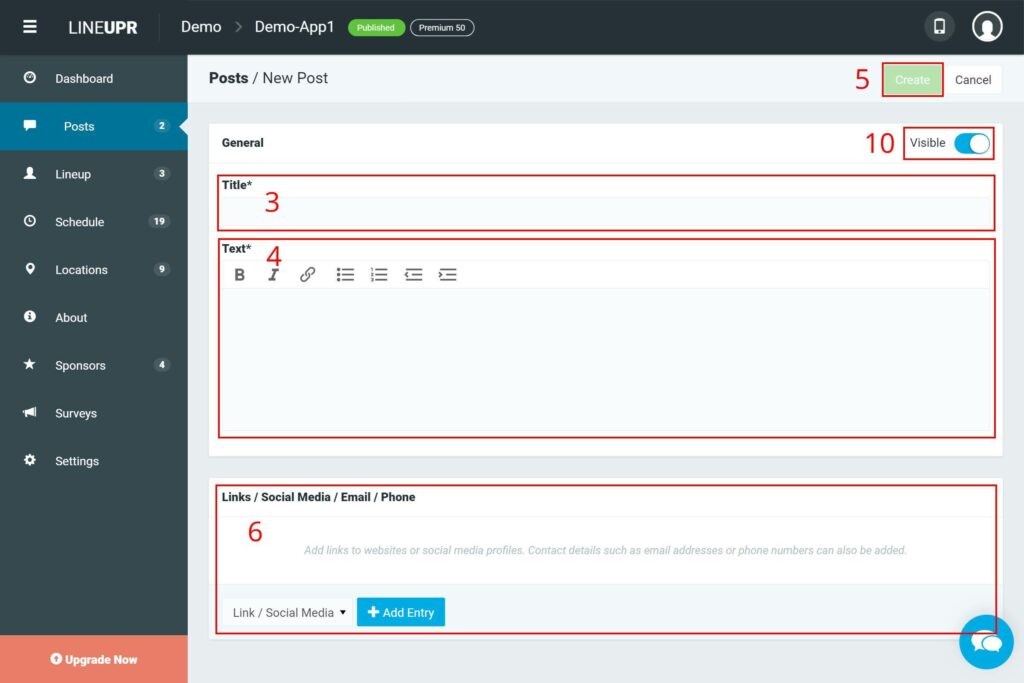
For the text creation we offer a simple text editor with which you can create bullet points, lists and links as well as write bold and italic.
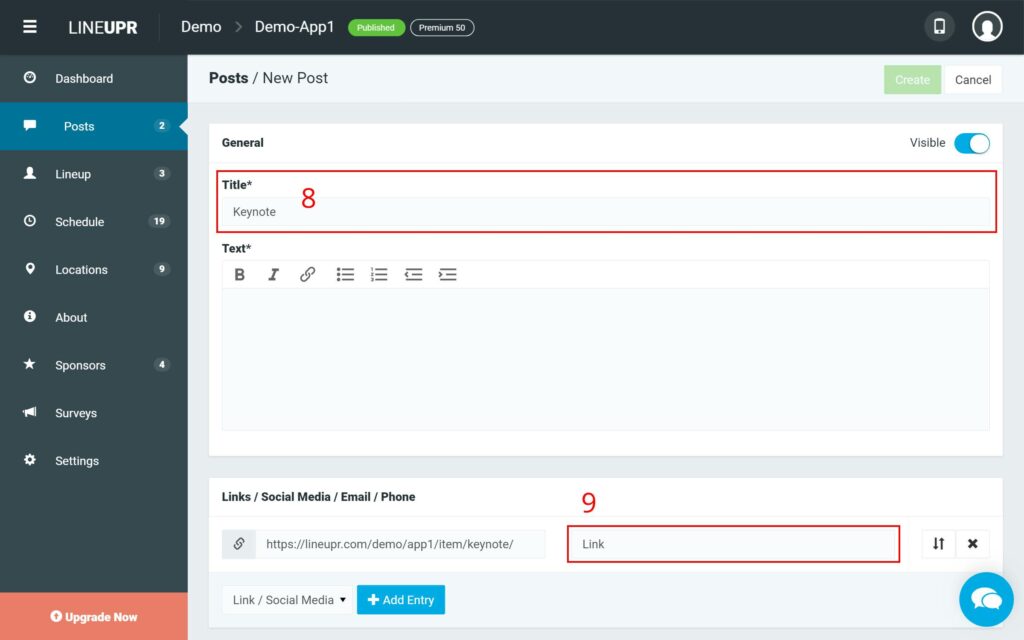
Besides, you can add more information (6) such as contact data and links to social networking profiles and websites. You can also link directly to a subpage of the app, e.g. a program item or present one of your sponsors, but more to this later.
To integrate such information, you must first select whether you want to add a link, an email address or a phone number and then click on “+ Add Entry”. Then quickly enter the data and you are done. Please note that a link must be complete, starting with http:// The same care applies to telephone numbers with the prefix. You can also specify in the “Description” field under which title the respective item is displayed.
Present Subpages and Profiles of the App via Post Messages
If your schedule changes spontaneously you have to inform your guests. The post feature is born for this situation. Send your guests a message and inform them of any adjustments. This message is even more successful if you connect it directly to the item so that the guests can see the new version in the schedule.
To do this, open the item in the “Schedule” menu. Now you are in the edit view. In the middle at the top you will find three symbols. Use the “Speech bubble” (7) and you will be directed to the creation view for a new post message.
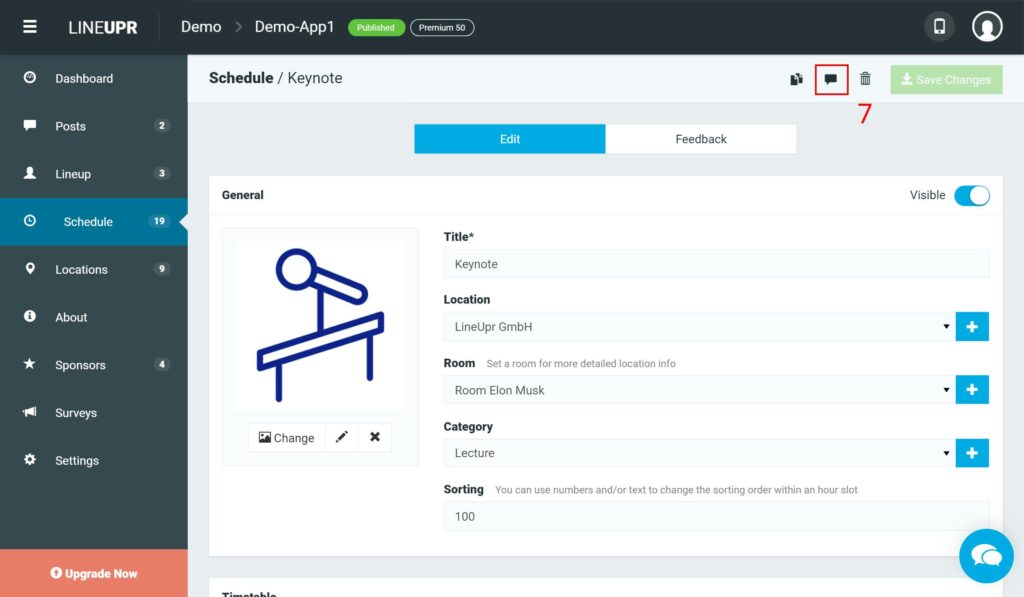
The name of the program item is automatically used for the „Title“ (8). But of course, you can adjust it. The name of the link (9) can also be changed. In the text, for example, you can explain what has changed. Via the post, your users get directly to the adjusted program item.
This is what a post could look like:

You can use the same principle to present your speakers and sponsors or to point out a survey. The message will take your participants directly to where you want them to go.
How to Plan Posts
With LineUpr you can create post messages in advance and publish them with one click at the desired time.
Just create a message, but before clicking on “Create”, change the “Visibility” (10) to “Invisible”. Now the post is created and you can publish it at the appropriate time.
This feature is particularly useful for the mandatory welcome messages and references to program items and surveys, as these are known well in advance.
You should also consider using it when it comes to notifying your guests about certain items. When the attendees open the app and instantly get a bulk of messages, chances are that the content will be forgotten or not read at all. Therefore, our tip: prepare the post and send it shortly before the item actually takes place.
Create and Edit Categories Globally in the App
In many tutorials, we have already dealt with the use and creation of categories. You can use categories to distinguish between locations and sponsors or to classify program items and people at your event.
In all these tutorials we created the categories directly during the creation of program items, persons, etc., but how can I edit or globally create these categories afterward?
Categories are only valid for the menu items (Location, Lineup, Program,…) in which they are created and not for the whole app. Therefore, these categories can only be edited in these areas. The process is the same for all menu items.
We take the schedule as an example. To change or create a category, first, click on the menu item “Schedule” (11) and then in the middle at the top on “Categories” (12).
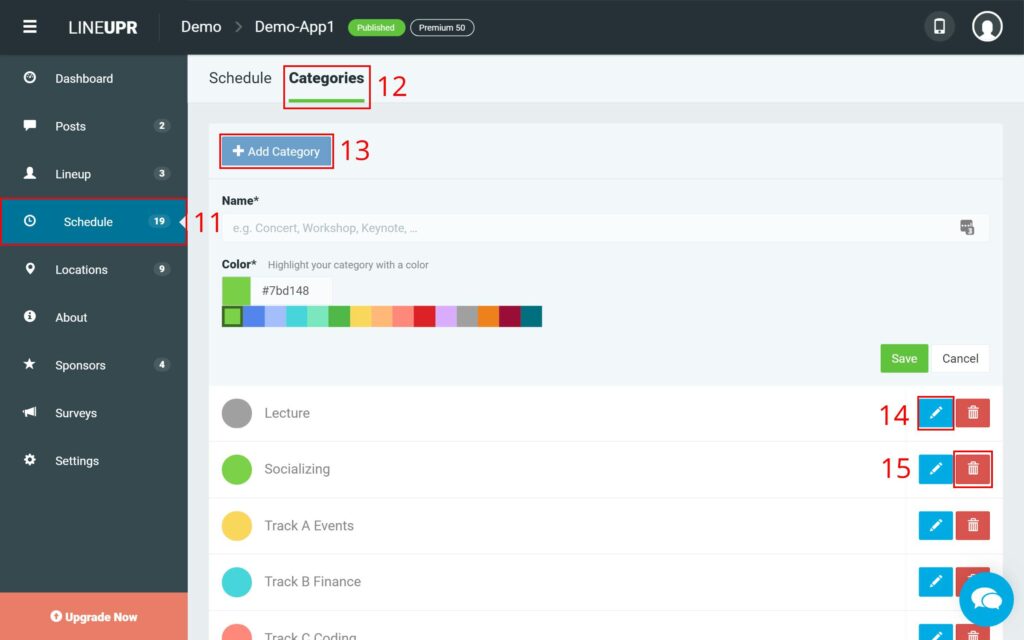
Here you can see all your categories created so far in a list. If you want to create a new category, click on “+ Add Category” (13). If you prefer to edit an existing category, click on the pencil symbol (14). If you want to delete a category, use the trash-bag-symbol (15).

No matter if you want to create a new category or edit an existing one, you always have the possibility to change the “Name” (16) and the assigned “Color” (17). Either use our color palette or an individual hex color code.
Learnings of the day
In this tutorial, we showed you how easy it is to create post messages for your event app. Use this feature to communicate spontaneous changes to your agenda or to increase the attention for your sponsors and speakers. Also, we took a look at creating, editing and deleting categories globally.
The next tutorial will take a look at how to create about pages and how to control the access and visibility of your app. More tutorials can be found on our blog.
What is your opinion about our post feature? Do you prefer push notifications? How do you judge that from the participant’s point of view? We are looking forward to your feedback.
“Message” Icon created by Lee Mette from “the Noun Project“.