Reading time: 6 minutes
In this tutorial, we deal in detail with sponsors in the app. We will show you how to develop an interactive presentation of your supporters.
The app offers many additional possibilities to present your sponsors and their products. This article explains further options.
As always, you will see examples of all the suggestions discussed here in our demo app.
Your First Sponsor Profile
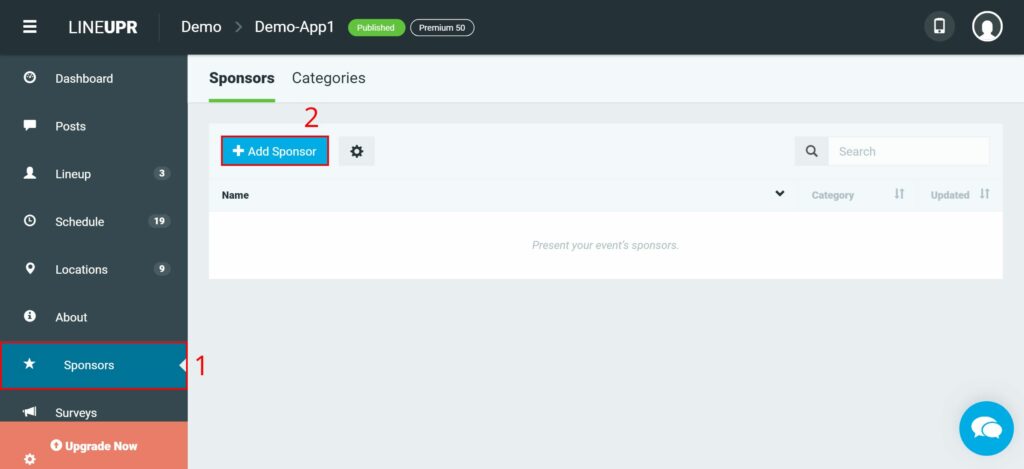
First, log into your account and access the dashboard of your event. Now navigate to the menu item “Sponsors” (1) and initiate the creation with a click on “+ Add Sponsor” (2).
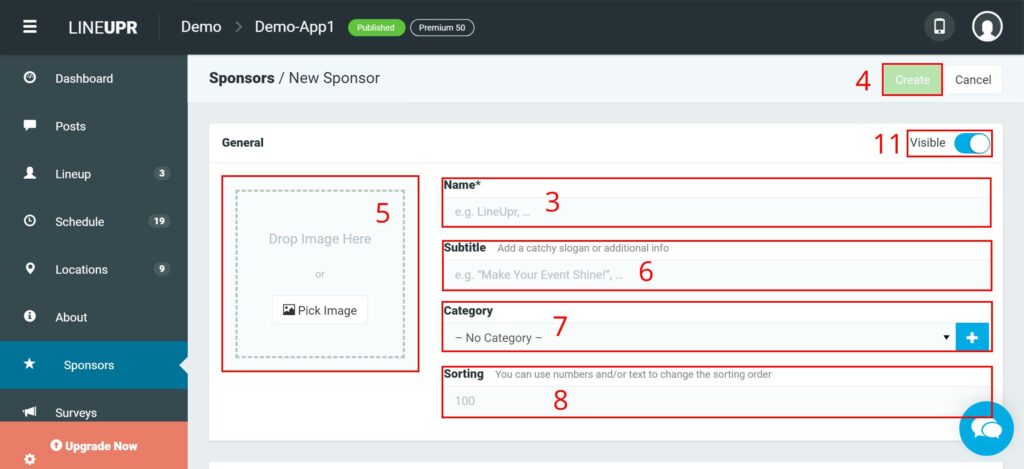
Now you should see the creation screen. To set up a new profile, enter the “Name” (3) of the sponsor. After that, you can already save and publish the profile with “Create” (4).
Additional Features
Besides the sponsor’s name, LineUpr offers you additional options to present external information and pictures.
1. Image (5)
You can include pictures for each sponsor profile. Most event organizers use the company logo here.
To use this option, either drag and drop your image or click on “Pick Image” and select one of the already existing ones. Or you can also upload an additional image by using the “Upload Images” button.
LineUpr supports JPEG and PNG formats. The image should be at least 300×300 pixels in size and square. We also offer an image editor for optimal depiction. To use it, first select the image. Now you see three options beneath the picture. With “Change” you can select a new image, with “X” you delete it and with the „Pencil“ button you can change the size (zoom), the background color and the position of the image. For corporate logos, the option of zooming is of primary interest, since many logos are rather wide and not quadratic.
2. Name (3)
Yes, you can change the name of the profile afterward.
For this, we have developed the input field “Name” in the first segment “General”.
3. Subtitle (6)
Present your sponsor with a message! This text is displayed beneath the name in the profile view.
Use this feature to present theme or vision of the sponsor. Or use it as a call to action like “talk to us!”.
4 Category (7)
You can assign a category to your sponsors.
Many events work with different types of sponsors. There are main sponsors, sponsors for technology, catering or location. Other event managers merely work with gold, silver and bronze sponsors.
The category function is used to make these different types of supporters visible. You can also use this feature to present your gold sponsors on the start screen of the app.
To use categories, either select an existing category in the “Category” field or create a new one using the “+” button.
5. Sorting (8)
By default, sponsors are listed in alphabetical order according to the profile name. However, sponsors who spend more should be presented more prominently.
Therefore LineUpr offers you the possibility to define the order yourself. To do so, use the field “Sorting” in the first block “General”.
With this feature, the order is still determined alphabetically. Numbers are placed before letters and profiles with a one are displayed at the top. Higher numbers below.
Note: The sorting is only displayed in the app and does not influence the order of the profiles in the LineUpr CMS. Here the sorting takes place according to the time of creation.

6. Description (9)
You can add a description text for sponsors. Tell your attendees more about the company. Which products do they offer? How do participants benefit?
Enter your text into the input field “Description”. We also offer a simple text editor to set bullet points and use bold, italic or underlined text.
7. Additional Information and Links (10)
Make sure to use the possibility of adding further external data to your sponsor profiles. You can link to the sponsor’s website, provide contact information such as phone number and email, or refer to other sources such as social networking profiles or product documents. Your sponsors will be happy if attendees can access their public channels via the app.
To integrate such information, at first, you have to select whether you want to enter a link, an email address or a phone number and choose “+ New Entry”. You have to enter links in full notation like „http://“. The same principle applies to telephone numbers and the area code.
In the “Description” input field next to the link, you can enter a description for that element. For example, the descriptions “Phone number of XYZ” or “LinkedIn profile” are very beneficial.
8. Visibility of Sponsor Profiles (13)
Some sponsors are only shown at the event and not in advance.
Nevertheless, you can still create the profile and change the slider in the upper right corner from “Visible” to “Invisible”. Now users cannot see this profile. When the time has come, you can publish it with one click.
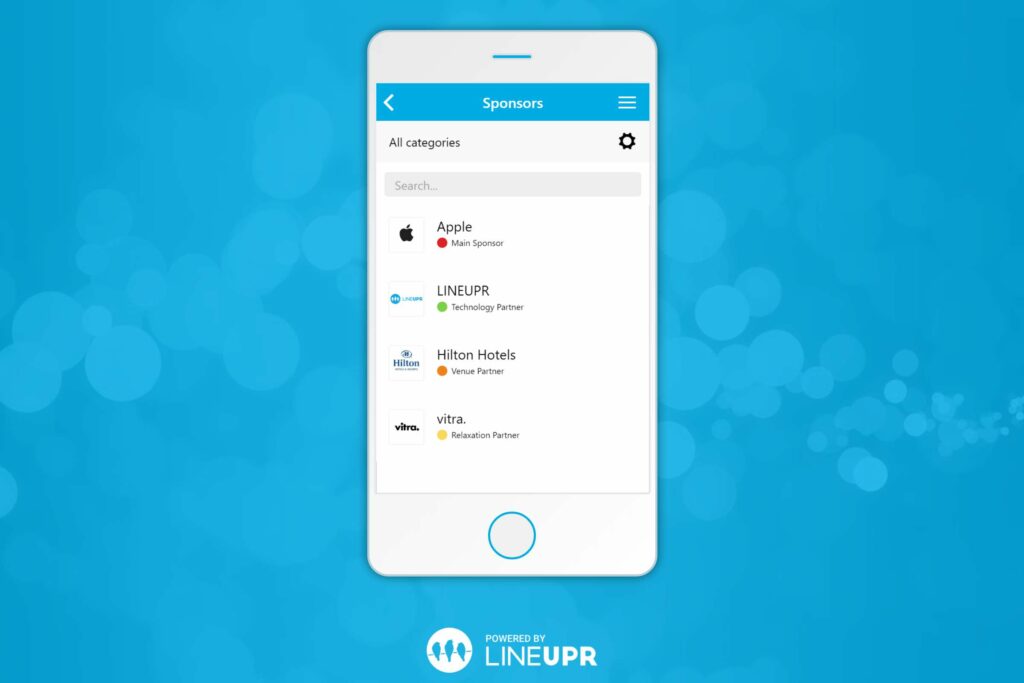
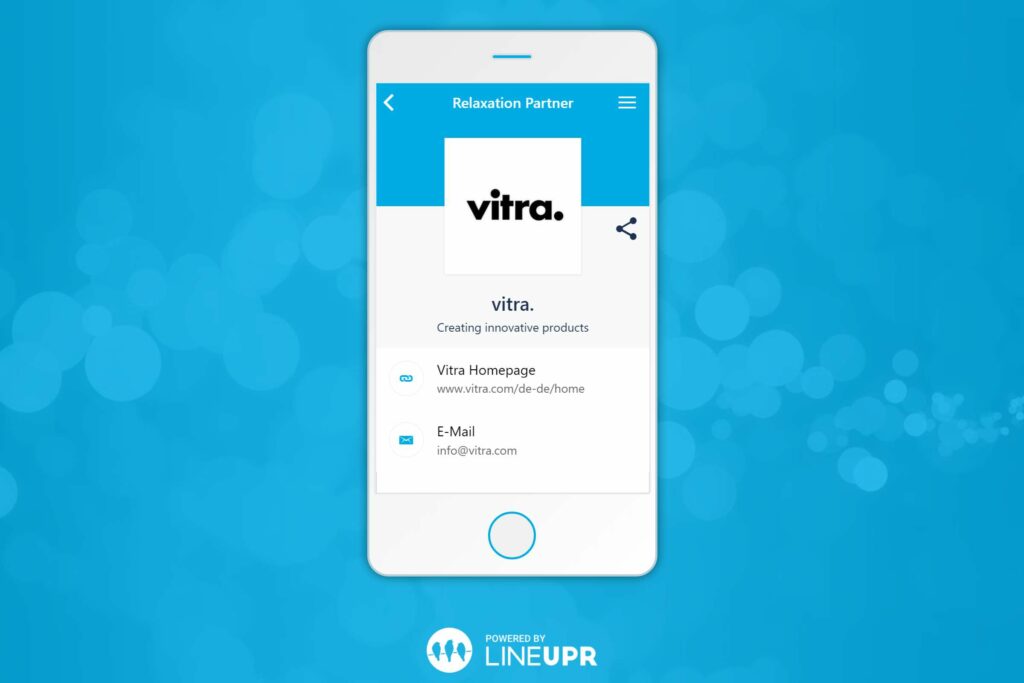
Result
This is, how a sponsor profile could look like:
Learnings of the day
In this tutorial, we’ve shown you how easy it is to create sponsor profiles for your event app. Present your sponsors interactively and help them to share their message with your participants.
More options to present your sponsors can be found here. Let your sponsors pay for the additional reach. You give them a measurable added value.
The next tutorial will deal with post messages and how you can create and edit categories. More on our blog.
What is your opinion about our sponsor profiles? What information do you usually use? Are you missing a feature? We are looking forward to your feedback.
“Client” Icon created by Chanut is Industries from “the Noun Project“.