Reading time: 8 minutes
In this tutorial, we will show you how to create profiles for your venues. Present them interactively in your event app. Use room plans, create rooms, integrate links and descriptions and many more.
In this tutorial we will deal in detail with venues. We will show you how to present locations interactively. Our starting point will be the fundamental creation of a basic profile. Afterward, we will introduce further features to you, such as creating rooms, integrating room plans and much more.
As a showcase, we use a demo app where you can experience the results of this tutorial, further examples of location profiles and additional content all by yourself on your smartphone
Your First Venue Profile
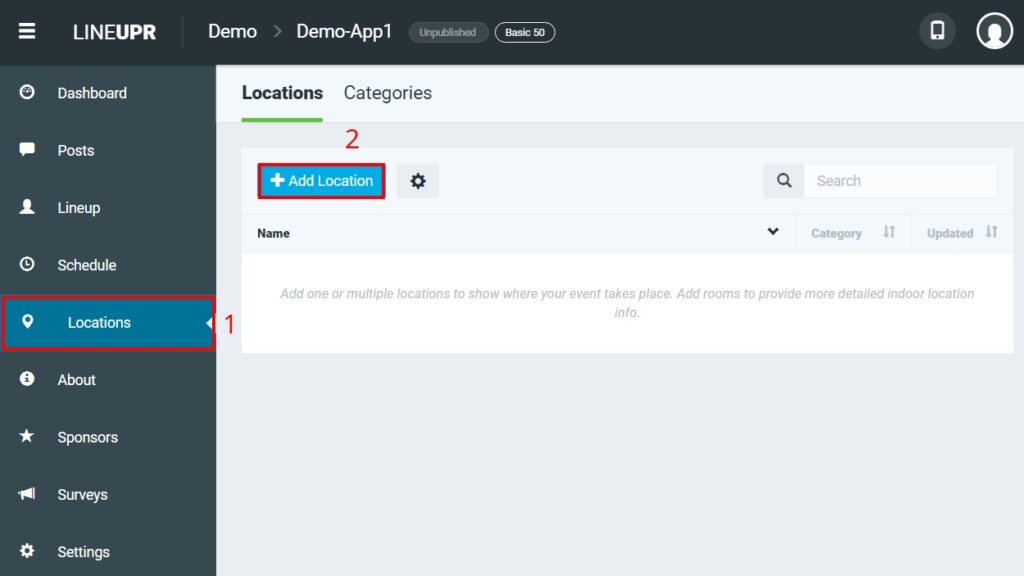
We start with the fundamental creation process of a venue profile. At first, you have to log into your account and access the dashboard of your event. You should now open the menu item “Location” (1) and initiate the creation with a click on “+ Add Location” (2).
Now you see the creation screen. We offer the option to upload the location data of your venue automatically via Google Maps. To do so, enter either the name of your company or the address in the top field (3). Now you will see possible options. Choose your preferred venue (4) and all known data (5) will automatically be transferred to the profile.
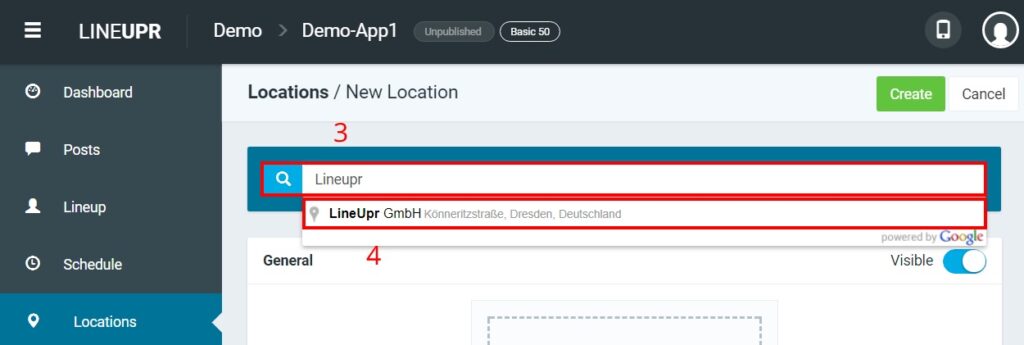
Your venue is also linked to Google Maps. Your visitors can use this information to navigate to your event.
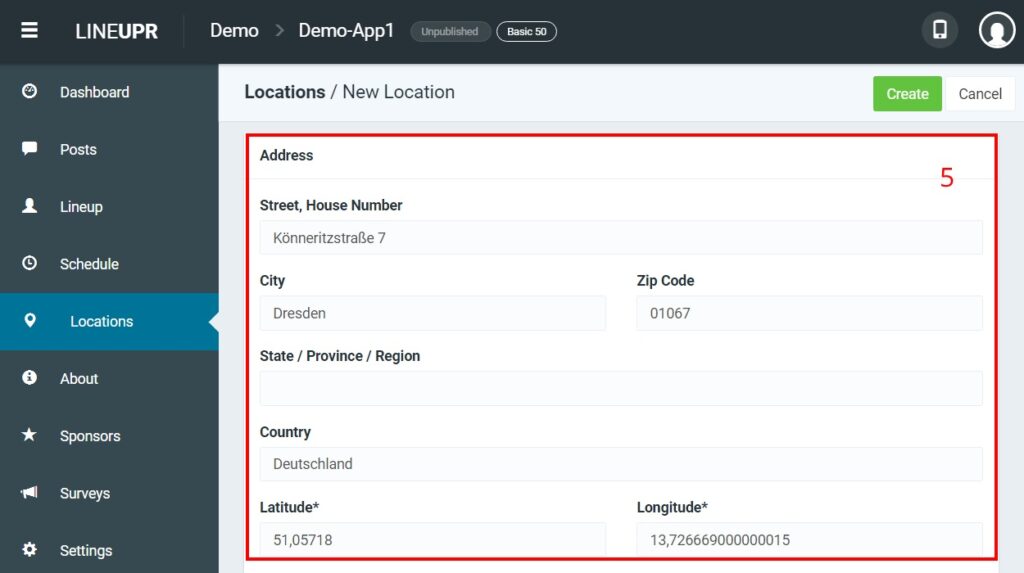
If your venue hasn‘t been displayed, you could also enter the information manually. To ensure that your location is linked correctly, you can either enter the latitude and longitude (6) or set the location marker (7) by hand. You can also place the tag first and then get the stored address data automatically (8) transferred to the profile.
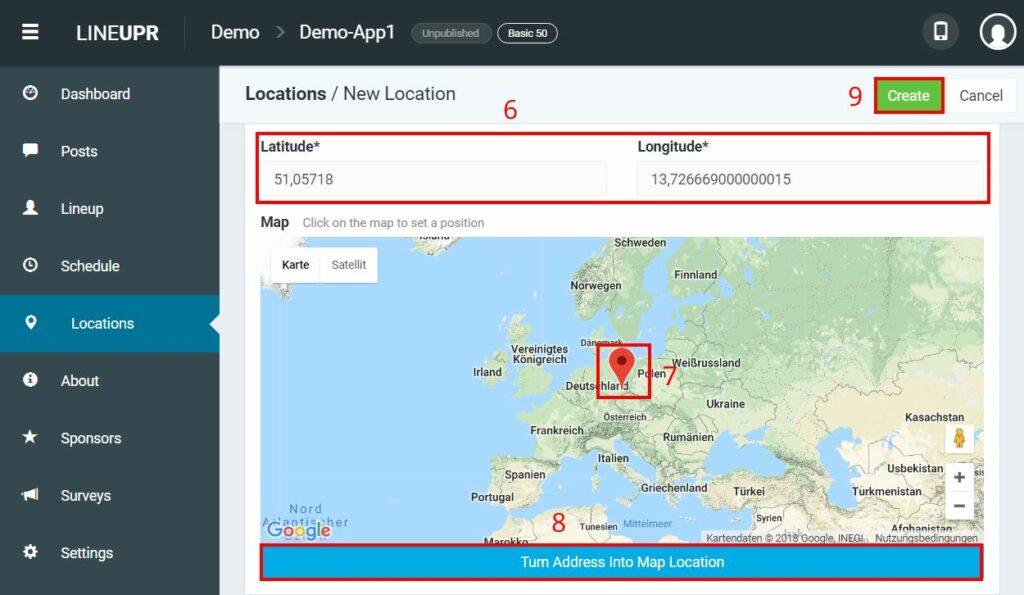
By using “Create” (9) you are done with the profile.
Additional Features
In addition to the necessary content, you can also integrate many other data into the profile. You can select these options in the creation screen of each venue profile.
1. Image
You can include pictures for each profile, even for venues.
To do so, either click on “Pick Image” or drag and drop your image or you use the “Upload Images” button to upload it to the app. You can also use pictures from other apps of your account (the drop-down box below the button “Upload Images”).
LineUpr supports JPEG and PNG formats. The image should be at least 300×300 pixels in size and square. We also offer an integrated image editor for optimal depiction. To use it, first select the image. Now you see three options beneath the picture. With the button “Change” you are able to select a new image, with “X” you delete it and with the „Pencil“ you can change the size (zoom), the background color and the position of the image.
2. Title
Yes, you can change the title of the venue. Just edit the current title in the input field „Name“ of the first block „General“.
3. Categories
You can assign a category to venues. For example, if you work with hotels, you could use the category “Accommodation”. If you are working with several stages and different kinds of themes or music, you could use these as categories.
To do this, select an existing category in the “Category” input field or create a new one by clicking the “+” button.
4. Sorting
If you use multiple venue profiles, they will be displayed in alphabetical order. However, you may want to change this order. For this purpose, we created the field “Sorting”. Venues with a small number like „1“ are shown at the top, profiles with a higher number further beneath.
5. Description
You can create a description of the location. Maybe, you want to introduce the venue in more detail. What makes it unique, why did you choose it? Of course, you can also add possible contact persons or integrate links.
Enter your text into the field “Description” below the „Map“. We also offer a simple text editor to set bullet points and use bold, italic or underlined text.
6. Rooms
There are rarely events where everything takes place in just one room or area. Often, event managers use several rooms and parallel sessions. For this reason, LineUpr allows you to create several rooms for each venue. Later in the action of creating program items, you can select these rooms or you can create additional ones. You can also create stages or something similar. The principle is the same.
You create new rooms via the button “+ New room” in the input field “Rooms” below the “Description”.
7. Room Plans
If your venue is remarkably seizable, your visitors could quickly lose track. Therefore, it is advisable to use one or more room plans. It is also possible to apply location maps.
To integrate a room plan, click on “+ New room plan” in the input field “Room Plans” below “Rooms”. Define a title and integrate the image. Here too, only JPEG and PNG formats are supported. Uploading a PDF is not possible.
8. Additional Information and Links
Depending on the type of venue, it can make sense to integrate other interactive elements. For example, you can enter contact data for selected contact people to which your guests can turn in case of problems. Or link the homepage of the location, so that your guests can get an idea of the venue.
To integrate such information, you have to first select whether you want to enter a link, email address or phone number and choose “+ New Entry”. Enter the data and you’re done. Please note that a link must be entered in full with „http://“. The same principle applies to telephone numbers with the area code. In the “Description” field next to the link, you can also enter a description for that element. For example, “Telephone number of XYZ”.
9. Hidden Venues
You may also work with currently still hidden venues. Nevertheless, you can still create the profile and change the slider in the upper right corner from “Visible” to “Invisible”. Now users cannot see this profile, but you have already created all the data. When the time has come, you can publish it with one click.
Learnings of the day
In this tutorial, we’ve shown you how quickly you can create profiles for your venues. Also, we offer you nine further features to integrate content into your profile for optimal usage.
In the future, we will present you further tutorials for the creation of program items, participants, sponsors and much more on our blog.
What’s your opinion about venue profiles? What information do you usually use? What other functions do you want in these profiles? We look forward to your feedback.
“Location” Icon created by Chameleon Design from “the Noun Project“.