Reading time: 7 minutes
In this tutorial, we’ll talk about the menu and labels in your LineUpr app in detail. We will show you how to choose the order of your menu points and how to define which menu items are only visible in the general menu and which are also visible on the home screen. We’ll also show you how to customize the labels of the menu items to match the language of your audience.
The featured examples can be found as always in our demo app.
Wording – The Language of your Participants
In addition to optics, language is also a way to create a pleasant environment for your participants. In order for you to create a mainly positive user experience for your guests, it is imperative to also use the titles and terms that your participants intuitively understand and feel comfortable with.
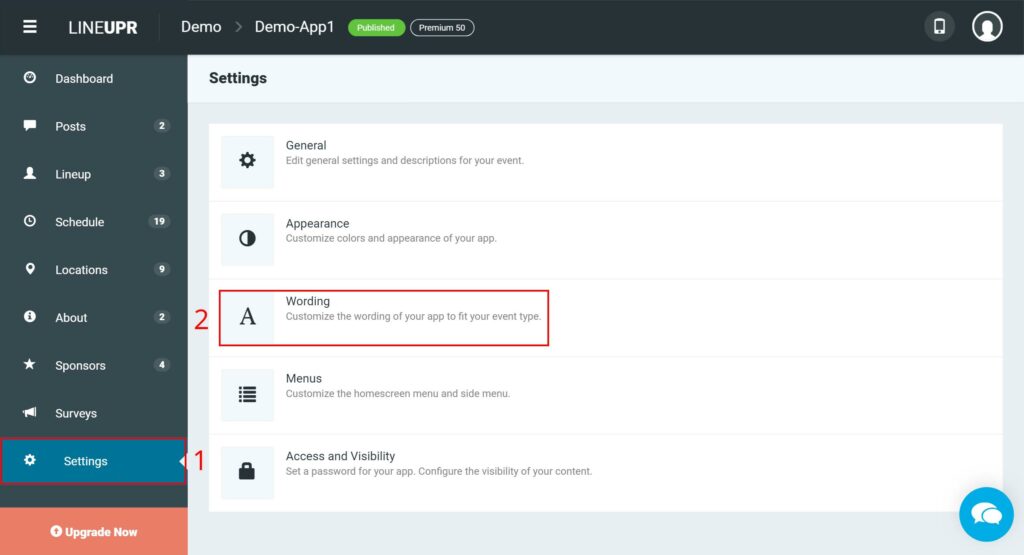
To integrate these terms into the app, first, log in to your account and go to your event dashboard. Now navigate to the menu item “Settings” (1) and click on “Wording” (2).
Here are a total of 15 ways to change titles in the app.
“Lineup” (3)
The title for the general menu item “Lineup” in the menu and on the home screen. Frequently used alternatives to “Lineup” are “Speakers”, “Participants”, “Guests”, etc.
“Lineup – Homescreen Subtitle” (4)
The title for the subtitle of the general menu item “Lineup” which is only displayed on the start page.
“Schedule” (5)
The title for the general menu item “Schedule”. Frequently used alternatives to “Schedule” are “Programm”, “Order”, or “Timetable”.
“Locations” (6)
The title for the general menu item “Location” in the menu and on the home screen, if there is more than one location. Frequently used alternatives to “Locations” are “Venues”, “Stages” or “Campus”.
“Location” (7)
The title for the general menu item “Location” in the menu and on the home screen, if there is only one location. Frequently used alternatives to “Location” are “Venue”, “Stage” or “Campus”.
“Room Plans” (8)
The title for the item “Room Plans”, which is displayed in the respective location, provided that at least one room or site plan is stored. Frequently used alternatives to “Room Plans”, are “Location Plan”, “Floor Plan” or “Stage Plan”.
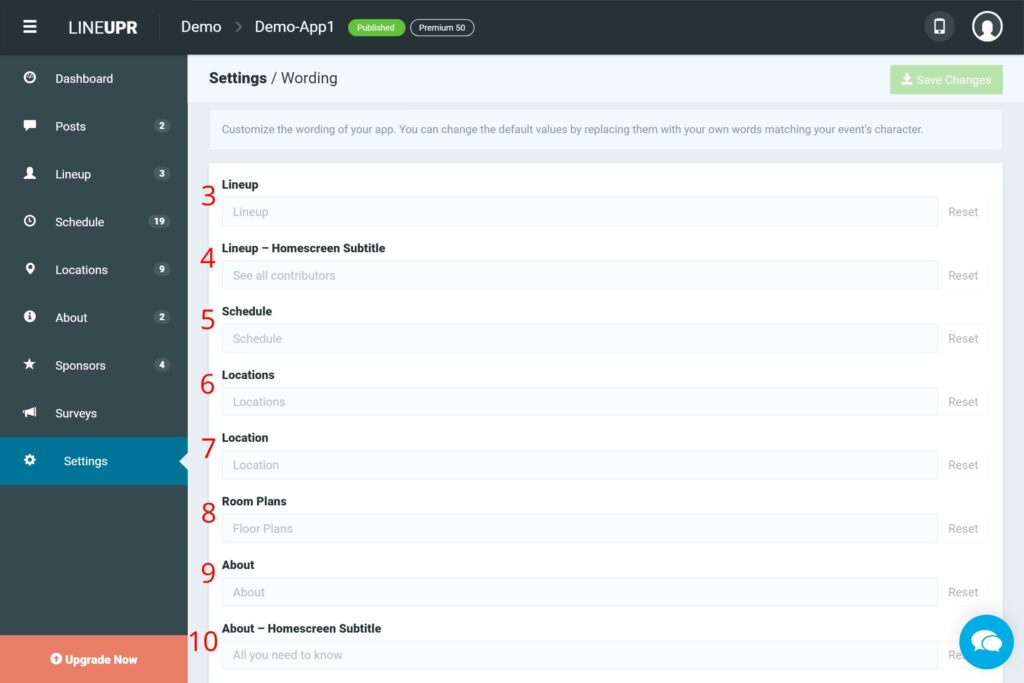
“About” (9)
The title for the item “About” in the menu and on the start screen. Under this menu item is one or more individual information pages. Depending on what information you present on these pages, you should also change the name. Do you use, for example, only an about page, then you should also rename the menu item accordingly. So the user can already find out directly on the home screen which information is hidden under this menu item.
“About – Homescreen Subtitle” (10)
The title for the subtitle of the general menu item “About” which is only displayed on the home screen.
“Sponsors” (11)
The title for the general menu item “Sponsors” in the menu and on the start screen, if more than one sponsor exists. Frequently used alternatives to “Sponsors” are “Partners”, “Co-operation Partners”, “Supporters” or “Friends”.
“Sponsors – Homescreen Subtitle” (12)
The title for the subtitle of the general menu item “Sponsors” which is only displayed on the homepage.
“Sponsor” (13)
The title for the general menu item “Sponsor” in the menu and on the start screen, if only one sponsor exists. Frequently used alternatives to “Sponsor” are “Partner”, “Co-operation Partner”, “Supporter”, “Patron” or “Friend”.

“Surveys” (14)
The title for the general menu option “Surveys” in the menu and on the home screen, if more than one survey exists. Frequently used alternatives to “Surveys” are “Feedback”, “Speaker Evaluations”, “Polls”, “Your Opinion” or “Opinions”.
“Survey” (15)
The title for the general menu option “Survey” in the menu and on the home screen, if only one survey exists. Frequently used alternatives to “Surveys” are “Feedback”, “Speaker Evaluation”, “Poll”, “Your Opinion” or “Opinions”.
“Registration / Ticket Button” (16)
The title for the “Registration / Ticket Button” bar, which is displayed on the home screen between the title / teaser image and the menu items on the home screen. Frequently used alternatives to “Registration” are “Sign Up”, “Tickets” or “Newsletters”.
“TBA – Placeholder when no location is set” (17)
Placeholder, if no location is assigned to a scheduler point. This placeholder is displayed both in the program flow overview and on the profile of the program points.
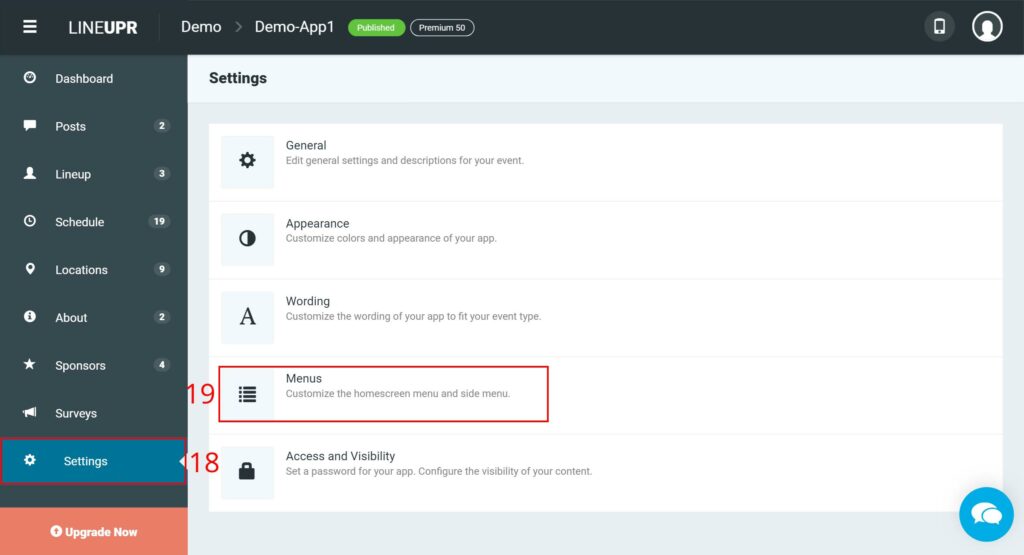
Personalise the Event App Menu
In addition to the titles, you can also customize the menu and the menu items of your event app to your liking. You have to navigate to the menu item “Settings” (18) and then to “Menus” (19).
The current order of all menu items is displayed here.
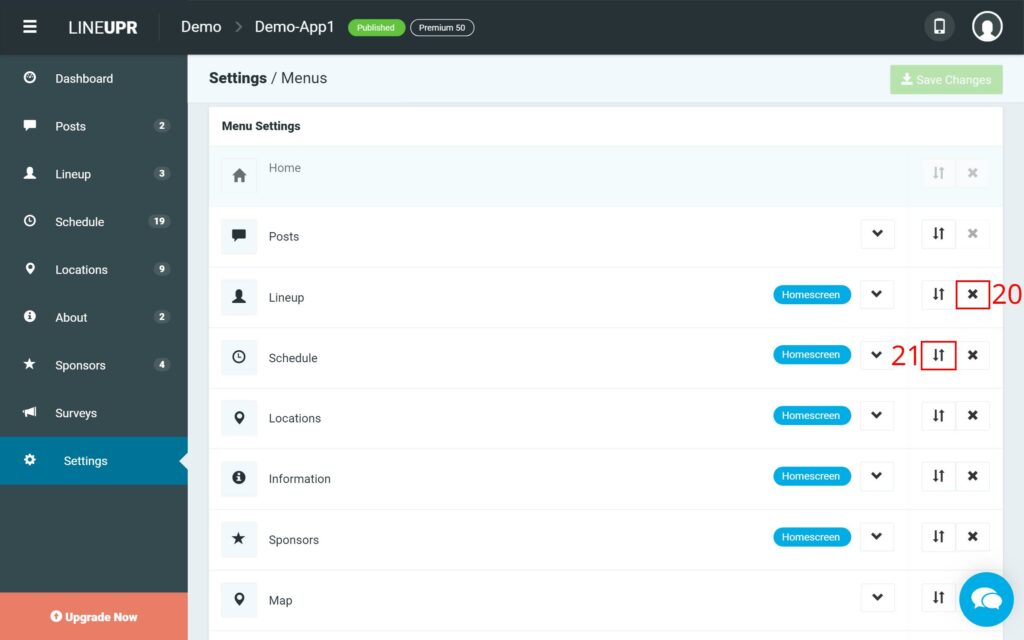
You can delete a menu item by clicking on the “X” (20) next to the menu item.
You can change the order of the menu items by repeatedly pressing the two opposite arrows (21) next to the respective menu item and moving the item up or down.
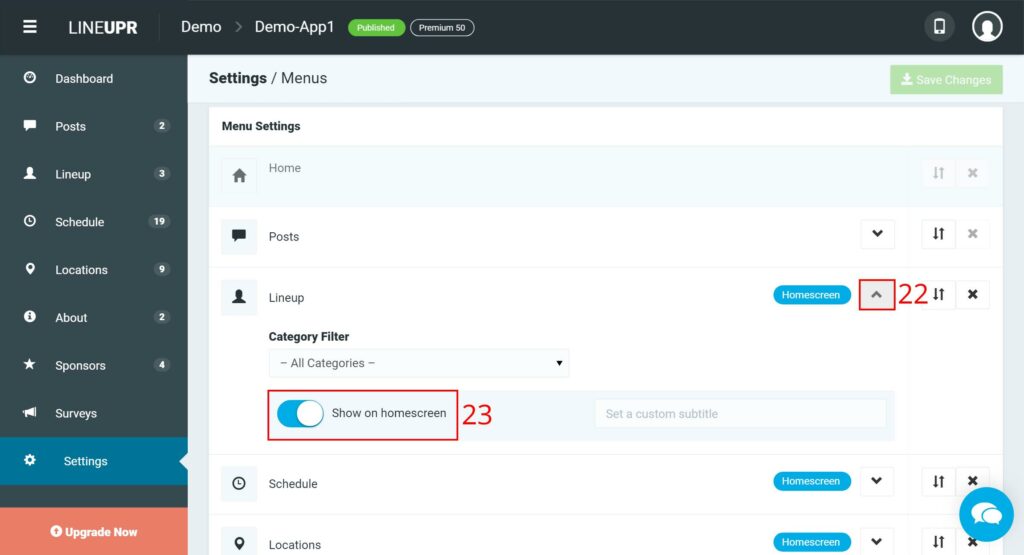
You can also define whether a menu item is only displayed in the general menu or on the home screen. To do this, you first have to click on the downward pointing arrow (22) of the respective menu item and here you can, via the slider (23), define whether the menu item should be displayed on the home screen of the app or not.
Create Individual Menu Items
In addition to the preset menu items, you can also create individual menu items based on categories. So you can, for example, generate the lineup menu item directly in different categories, such as a menu item for attendees and one for presenters. If you forgo this, then all of these persons will be displayed together in the menu item Lineup.
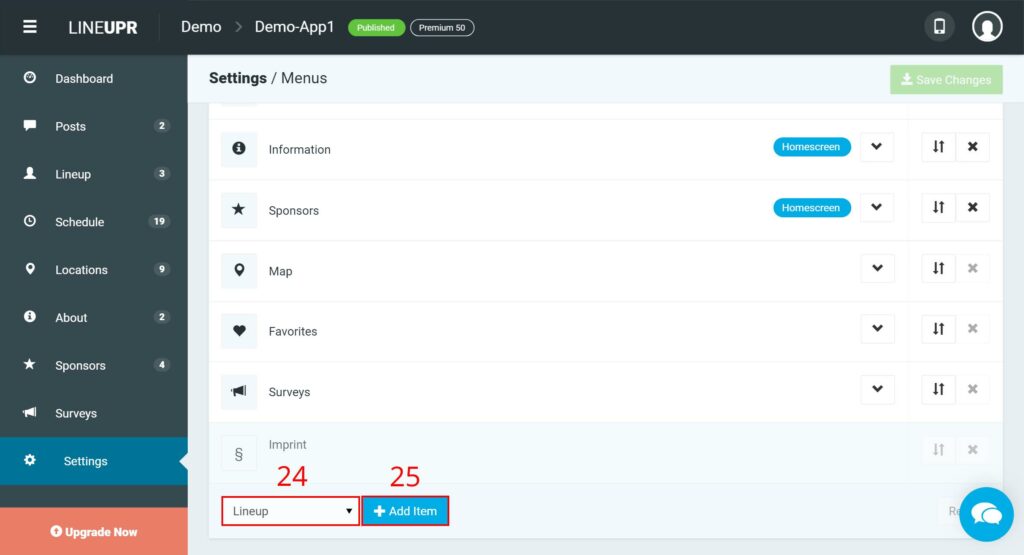
To create custom menu items, first, select the type of underlying menu item (24) and then click on “Add entry” (25).
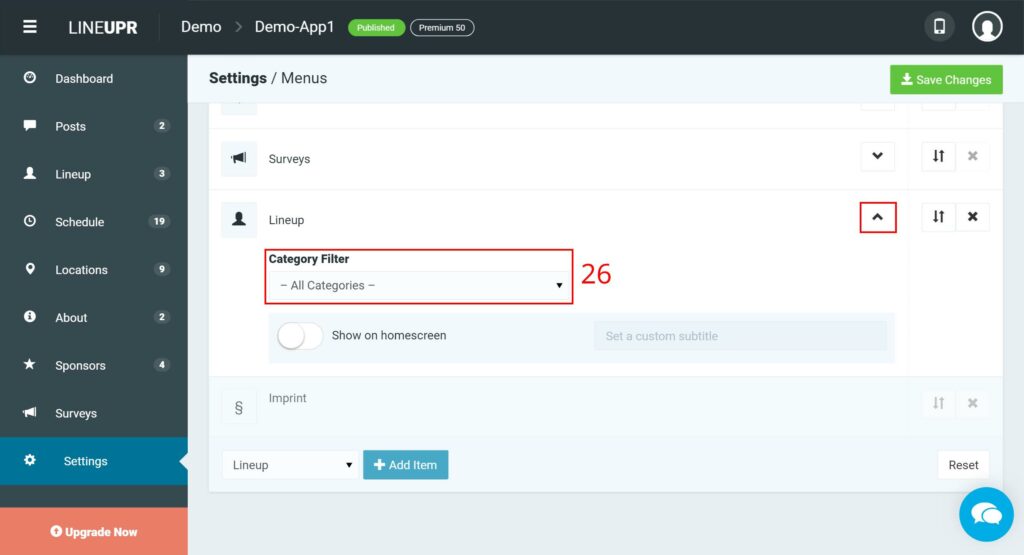
After creating this new menu item, click on the down arrow. After that, a small window will open where you can define a “category filter” (26) for this menu item.
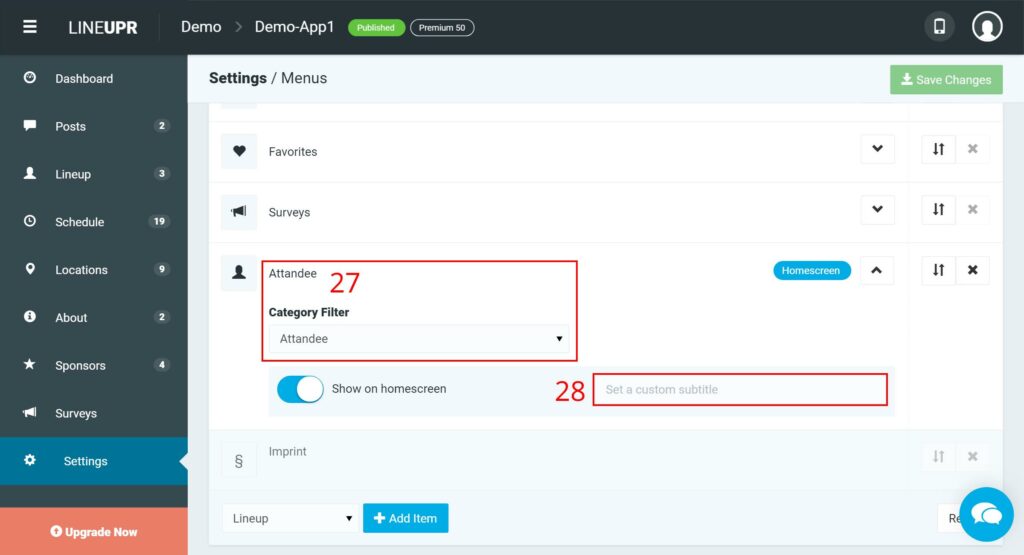
When you have decided on a category, then the title (27) of this menu item, which takes the title of the category, automatically changes as well. You can also define an individual subtitle (28) for the menu item here.
What should you have learned
In this tutorial, we introduced you to how you can customize the language and menu items of your app to your liking. Use this opportunity to make your participants enjoy the experience even more.
In the next tutorial, we will deal with the subject of surveys. What types of surveys do we offer and how should they be used for optimal success. More on our blog.
“Design” Icon created by Ryan Beck from “the Noun Project“.